Warning. You may become obsessed with personalizing everything after trying this fun stenciling technique. This no sew version of monogramming was my quick go to solution for handmade presents during the holiday season. My tutorial requires the use of a Cricut machine but you really don’t need it to make your own freezer paper stencils.
Materials & Supplies
- Renoylds Freezer Paper
- Cricut Create*
- Don Juan Cartridge (comes with the Create)*
- Pressing cloth
- Iron
- Foam pouncer or brush
- Acrylic craft paint or fabric paint
- Cozy Faux Sherpa Blanket
*If you do not have a Cricut or die-cutting machine, a set of large (3 inch and up) lettering stencils, cutting mat and craft knife will do.
How To: Personalize a Cozy Faux Sherpa Blanket with DIY Freezer Paper Stencils and Craft Paint
Step 1:
Cut your freezer paper into a 6 x 12 in rectangle to fit your Cricut mat (depends on your model of course). Place the paper shiny side down. Insert the Don Juan cartridge in your machine, turn on and load mat. Pretty easy so far!
Step 2:
Set the size dial to 2.75 to 3. 5 inches depending on the size of the item you are personalizing. Since my blankets were fairly big, I went with larger letters. Choose the “Marquee” feature followed by the letters you wish to cut. Depending on the size, I was able to fit 3-4 letters per sheet of freezer paper.
Voila! Here are my freezer paper lettering stencils.
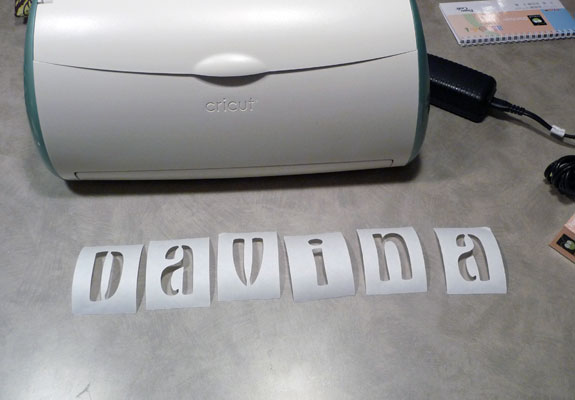 Now if you don’t have a die cutting machine, (because not everyone is as craft obsessed as I am or they would rather spend the money on something else - totally understandable) there is no need to despair. My suggestion would be to purchase a cheap set of stencils so you can trace the letters directly onto the freezer paper. Lay out your freezer paper on a cutting mat and carefully cut out the letter stencils with a sharp crafting knife. An even more cost efficient way to make your own stencils is to find a font you like and print letters off your computer. You can then trace the letters onto the freezer paper.
Step 3:
Arrange your stencils (shiny side down) on the faux sherpa blanket. Carefully place a pressing cloth (I just used a spare piece of quilt weight 100% cotton) over your work.
Step 4:
Using the lowest heat setting, iron the stencils onto the blanket. Be sure to press firmly to smooth out any gaps between the paper and the fabric. You want the stencils to really stick to the fabric. This will keep the paint from bleeding underneath the stencils.
Step 5:
Use a foam pouncer or brush to apply paint to the stenciled areas. Although it requires some time and patience, I personally found it better to apply 3 coats of paint instead of 1 thick and gooey layer. Allow the paint to dry between coats. For this project I used Martha Stewart Craft paint by Plaid in Vanilla Bean (satin finish).
Step 6:
Once the paint is fully dried you can carefully peel off the freezer paper. Go slow as the paper rips easily and it is quite hard to peel those tiny bits around the painted letters. Maybe I ironed mine stencils a little too vigorously!
Step 7:
Almost there! Place the pressing cloth over the painted area. Using the lowest heat setting, press over the stenciled letters. Just move your iron over the area for about 2 minutes or so. Doing this will heat set the paint. Allow 21 days for the paint to fully cure. Basically that means, don’t throw your personalized blanket in the wash for at least 3 weeks. I knew my nieces and nephews would want to use the blankets right away so I washed and dried them BEFORE I started personalizing them.
This one was a house warming present for my sister in law. I love how it turned out. Basically, freezer paper stenciling on fabric is the poor girl’s version of silk screening!
So what will you try stenciling first? A tote bag? Onesie? T-Shirt…Imagine all the possibilities…
Be sure to read these popular posts for more crafty projects and ideas:
Thanks for visiting inspirednest.ca. If you liked this post, why not leave a comment or subscribe to the blog via RSS Feed. You can also  or Twitter for the latest updates!



{ 3 comments… read them below or add one }
Wow! I hadn’t even heard of freezer paper! This is super cool, thanks for showing it!
Hello, I love this! Can you do this on a fleece blanket? thank you
Hi Elma,
I have not tried the freezer paper stencils on fleece yet. I would suggest trying the stencils on a small piece of fleece to see if it can withstand the heat from the iron. My worry is the fleece might “melt” if the iron is too hot. Start with the lowest heat setting and slowly turn it up until the stencils stick to the fleece without ruining the fabric. Be sure to lay a piece of cotton cloth over the stencils before you iron. This too will help protect the fleece from too much heat. Good luck!
{ 1 trackback }